

Building Etch-A-Sketch Using JavaScript: Get Better at Coding 🖌🎨
Recreate an online canvas and become pro at JS


Etch-a-sketch is a browser canvas that I built using HTML, CSS and JS. I didn't come up with the idea though, the credits go to TheOdinProject, one of the best sites to learn Full Stack JavaScipt Development or Full Stack Ruby Development.
The Functionality ⚙
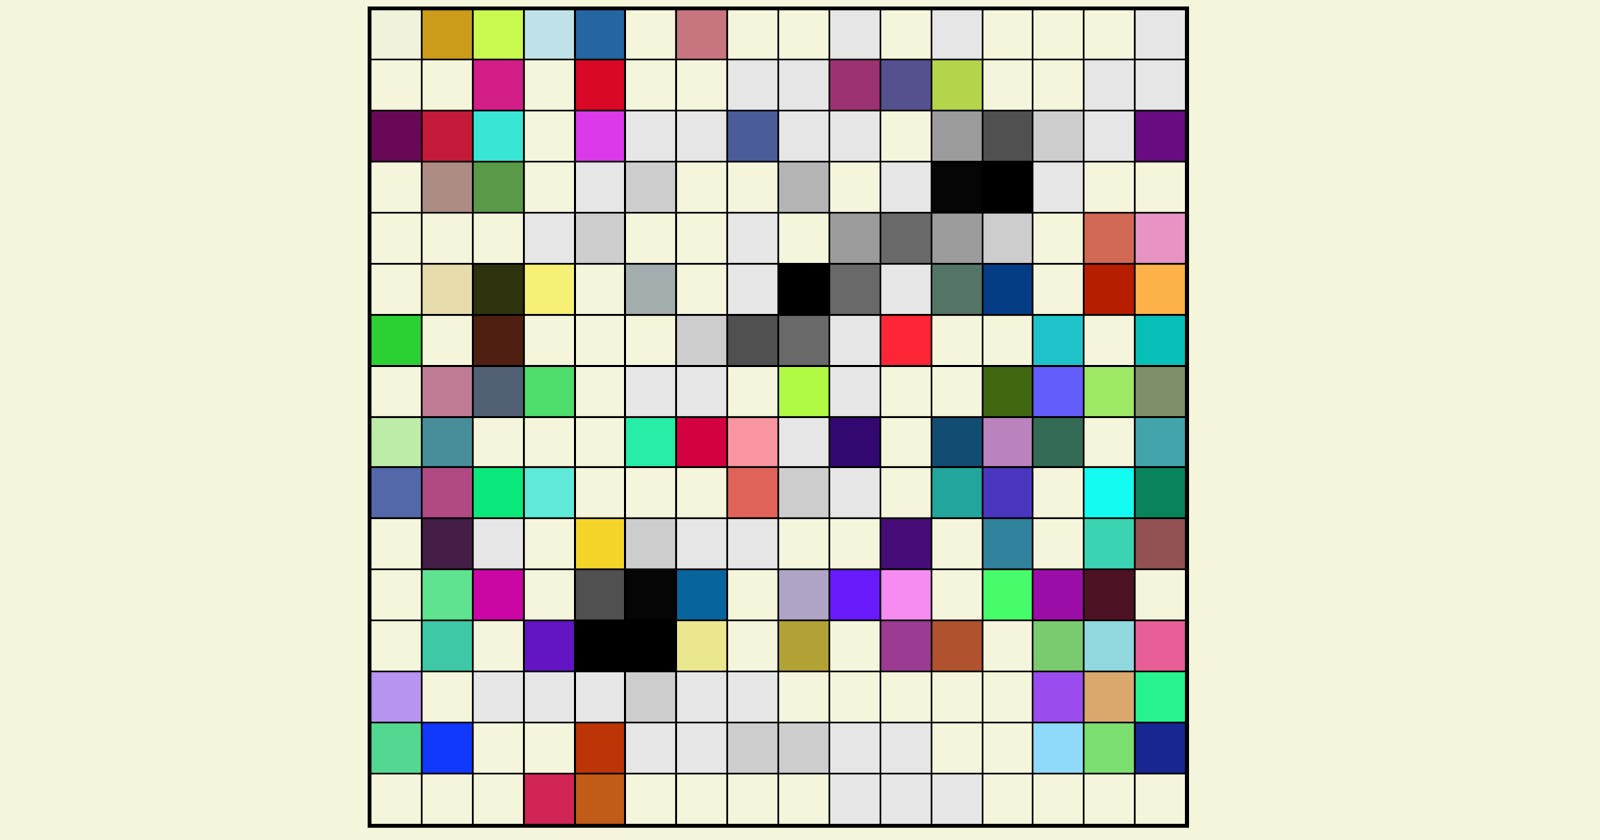
If you navigate to my version of etch-a-sketch, you'll notice there are four buttons above the canvas.

Clear Grid is used to wipe out the contents of the current grid and prompts the user to enter a length for the square grid.
Set Grid Size does the same thing as Clear Grid but just makes the functionality clear.
Rainbow colour changes the color of the pixels that get hovered over from becoming plain black to any random colour. (We'll understand how later in the article).
Shading makes the hovered squares just a little darker than white. Every time the user hovers over those specific squares again, they will get about 10% darker. Pretty cool, isn't it?
The HTML & CSS
<!DOCTYPE html>
<html>
    <head>
        <title>Etch-A-Sketch</title>
        <link rel="stylesheet" href="style.css">
        <link href="https://fonts.googleapis.com/css2?family=Source+Code+Pro:wght@300&display=swap" rel="stylesheet">
    </head>
    <body>
        <div class="complete">
            <!-- Control Buttons -->
            <button class="clear btn">Clear Grid</button>
            <button class="set-grid btn">Set Grid Size</button>
            <button class="rainbow btn">Rainbow colour</button>
            <button class="shade btn">Shading</button>
            <!-- Container with the grid -->
            <div class="container"></div>
        </div>
        <script src="script.js"></script>
    </body>
</html>
body {
    font-family: 'Source Code Pro', monospace;
    width: 100%;
    background-color: beige;
}
.complete {
    width: 50%;
    position: absolute;
    top: 40px;
    left: 470px;
}
.btn {
    font-family: 'Source Code Pro', monospace;
    font-weight: 500;
    font-size: 15px;
    background-color: white;
    cursor: pointer;
    margin-right: 10px;
}
.container {
    border: 3px solid black;
    display: grid;
    position: relative;
    right: 30px;
    bottom: 30px;
    padding: 0px;
    margin-top: 50px;
    width: 600px;
    height: 600px;
}
So what I'm doing in the HTML and CSS files is hopefully pretty straightforward (like expressing my love for the Source Code Pro font). I'm using display: grid; for the container class to make it look grid-like. Also, we're making use of several CSS grid properties in JavaScript code as well, for example, when setting a new canvas size.
Dividing the code up
Note: for the JavaScript, here's my source code on GitHub. If you ever get confused about the order in which the code goes in, please refer to this file. I've grouped parts of my code into sections to help readers easily navigate through my code.
Throughout the rest of the blog, I'll be telling you the section in which the next function/piece of code will go into.
There are 4 sections in the code:
Variable declarations including the button elements from the HTML.
Utility math functions
Functions for the grid
Event listeners
Variable declarations
These variables go at the top of your code:
const clearBtn = document.querySelector('.clear');
const setGridBtn = document.querySelector('.set-grid');
const rainbowBtn = document.querySelector('.rainbow');
const container = document.querySelector('.container');
const shadeBtn = document.querySelector('.shade');
let rainbowColorIsOn = false;
We're accessing each button using the document.querySelector() function and their class name. Also, we're declaring a variable called rainbowColorIsOn to keep track of whether or not we're actively using the rainbow coloring feature.
Initializing the grid
Add the following code:
function makeGrid(num = 16){
    container.style.gridTemplateColumns = `repeat(${num}, minmax(0px, 1fr))`;
}

function addMouseoverToGrids() {
    const grids = document.querySelectorAll('.grid');
    if (rainbowColorIsOn == true) {
        grids.forEach(element=> element.addEventListener('mouseover', changePencilColor(randomColor())));
    } else {
        grids.forEach(element=> element.addEventListener('mouseover', changePencilColor('rgb(0, 0, 0)')));
    }
}

function createDivs(num=16) {
    for (let i = 1; i <= num * num; i++) {
        let div = document.createElement('div');
        div.style.border = "black solid 1px";
        div.classList.add('grid');
        container.appendChild(div);
    }
}

function init() {
    createDivs();
    addMouseoverToGrids();
    makeGrid();
}

window.addEventListener('load', init())
In this code, we're defining three functions, makeGrid() , addMouseoverToGrids() and createDivs() , all of which run inside a function called init() .
makeGrid() has a parameter called num , indicating the number of rows or columns of the square grid, with a default value of 16. It edits the style of the container element and sets the gridTemplateColumns property to, in this case, repeat(16, minmax(0px, 1fr)) . If you're unsure of these CSS grid properties and CSS functions, read this CSS Cheat Sheet belonging to css-tricks.com.
addMouseOverToGrids() selects all of the elements with the .grid class (so all of the divs that get created in createDivs() ) and adds an event listener to each one of them using the Array.forEach() function in javascript. The mouseover event indicates the mouse hovering over the particular div, and the function passed to the event listener depends upon the value of rainbowColorIsOn . If it's true, then we're passing the function returned by changePencilColor() , which we'll understand later.
createDivs() , just like makeGrid() has a parameter called num , set to 16 by default. A for loop runs, and we add x number of divs to our container, where x equals num^2. This is because the number of squares inside the main grid equals the length^2, which is num^2. We're also adding a couple of properties to the divs that are created and adding a black border to them.
In init() , we create the divs using createDivs() , add event listeners to them using addMouseoverToGrids() and style them properly using makeGrid() . If makeGrid() wasn't there, the grid wouldn't look... grid-like. Try it out for yourself!
Rainbow Coloring
How do we generate random colors? Well, we can generate random numbers in a particular range in javascript. So, we could generate 3 random numbers and make an RGB colour out of them! Let's implement this.
function randomInt(min = 0, max = 255) {
    return Math.floor(Math.random() * (max - min) ) + min;
}

function randomColor() {
    return `rgb(${randomInt()}, ${randomInt()}, ${randomInt()})`;
}

function changePencilColor(color) {
    return function(e) {
        e.target.style.backgroundColor = color;
    }
}

rainbowBtn.addEventListener('click', function() {
    rainbowColorIsOn = !rainbowColorIsOn
    addMouseoverToGrids()
});
Let's understand this code:
The
randomInt()function generates a random number between the range of 0 and 255, using a combination of theMath.random()andMath.floor()functions. If you don't understand this, check this out to grasp the logic better.The
randomColor()function generates an RGB color code with 3 values, each of which are random numbers obtained from therandomInt()function.changePencilColor()returns a callback function which is used inaddMouseoverToGrids(). So, when the user hovers over a square, the square will change its background color to the color passed as an argument tochangePencilColor().rainbowBtn.addEventListeneradds an event listener to the rainbow coloring button and when it gets clicked,rainbowColorIsOnbecomes its opposite value (so it toggles itself) and we runaddMouseoverToGrids()again, to change the event listeners.
If you don't understand the code, just try and mentally imagine the order of the execution of the code that takes place once the user clicks on the rainbow button.
Shading
Shading isn't that complicated. Every time the user hovers over the square, we need to make it darker, so we need to decrease all three of its RGB values.
function darkenPencilColor() {
    let dark = 255;
    return function(e) {
        dark -= 25;
        e.target.style.backgroundColor = `rgb(${dark}, ${dark}, ${dark})`;
    }
}

shadeBtn.addEventListener('click', function() {
    const grids = document.querySelectorAll('.grid');
    grids.forEach(grid => grid.addEventListener('mouseover', darkenPencilColor()));
});
dark is set to 255, which is black. With every hover, dark decreases by 25, and the background color changes accordingly. We're also adding an event listener to shadeBtn , and adding an event listener to each grid square, changing the value of the callback function returned from changePencilColor() to darkenPencilColor() instead.
Clearing the Grid & Setting New Grid Size
I'll show the code for this together, since they are very related to each other.
function changeGridSize() {
    const newGridSize = parseInt(prompt("Enter a number:", "between 2-100"));
    if (newGridSize < 2 || newGridSize > 100 || !newGridSize) {
        newGridSize = 16;
    }
    container.innerHTML = '';
    createDivs(newGridSize);
    addMouseoverToGrids();
    makeGrid(newGridSize);
}

function resetGrid() {
    let newGridSize = parseInt(prompt("Enter a number:", "between 2-100"));
    if (newGridSize < 2 || newGridSize > 100 || !newGridSize) {
        newGridSize = 16;
    }
    container.innerHTML = '';
    createDivs(newGridSize);
    addMouseoverToGrids();
    makeGrid(newGridSize);
}

setGridBtn.addEventListener('click', function() {
    changeGridSize();
});

clearBtn.addEventListener('click', function() {
    resetGrid();
});
changeGridSize() and resetGrid() do literally the same thing, idk why I made different functions for them. (Maybe because I hadn't written this article yet)
Both of them prompt the user to enter a grid size, and they use the functions that we used in init() to create the divs and add event listeners to them. This time though, we don't rely on the default argument of 16, but instead the number that the user enters.
Lastly, we add event listeners to setGridBtn and clearBtn to make them function properly.
If you stuck with me so far, that's the end of it!
If you want to review and go through the code yourself, here's the link to my Github repository. I'm sure you enjoyed this article, so press the like button. It will help me a ton since I can reach out to more developers who need such informative articles. I welcome any feedback, so please drop a comment.
Thanks for reading!